
Dog Nail Scratch Board: How to Use It (Day-by-Day Training Guide)
To use a dog nail scratch board, place it on the floor with treats in the compartment and let your dog approach on their own terms. Do not guide their paws. Reward any contact with the board -- sniffing, licking, pawing. Within 3-7 days, most dogs are actively scratching and filing their nails independently.

The board works because scratching is a natural dog behavior. The treat motivation directs the scratching to the sandpaper surface. Your job is to reinforce the behavior, not to perform the grooming.
TL;DR - Day 1-2: Introduction only -- board on floor, treats visible, no paw guidance - Day 3-4: First scratches appear -- reward each one immediately - Day 5-7: Dog scratches confidently and voluntarily -- nails are visibly shorter - After day 7: Maintain 3-4 sessions per week, 5 minutes each
Why Most Dogs Won't Use a Scratch Board (And What to Do About It)
The most common complaint in every scratch board review: "My dog just sniffs it and walks away." Or: "My dog scratched once, then never again."
The reason is almost always the same: the training method is missing. The board is a training tool. Without a training sequence, you have a hardwood board on your floor that your dog doesn't know what to do with.
The instinct for most owners is to take their dog's paws and place them on the board. Don't. Paw placement by the owner feels like restraint to the dog -- and for a dog who's already anxious about nail care, restraint is the trigger. Guided paw placement usually causes the dog to pull back and distrust the board.
The right approach is patience and high-value treats. Your dog figures it out. That's not a slow method -- it's a faster method, because you're building genuine enthusiasm instead of reluctant compliance.
What You Need Before You Start
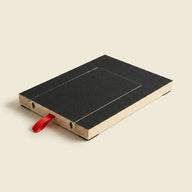
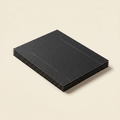
- The scratch board (hardwood board with sandpaper pad + treat compartment)
- High-value treats: small, soft, fast to eat. Cooked chicken, squeeze cheese, commercial training treats. Not kibble -- you need something the dog is genuinely motivated for.
- A quiet room without other pets or distractions.
- 5 minutes per session, 1-2 sessions per day.
Check the sandpaper pad before you start: it should be flat against the board with no lifted edges. New boards may have a slight smell from the hardwood -- leave the board out for a day before the first session if your dog is sensitive to new scents.
Day-by-Day Training Guide
Day 1: Introduction Only
Place the board on the floor. Load the treat compartment with high-value treats. Step back.
Your role today: reward any interaction the dog has with the board on their own terms. Sniffing the edge? Reward. Licking the treat compartment? Reward. Pawing lightly at the side? Reward.
Do not place their paws on the board. Do not lure them onto the board with a treat held above it. Just reward what happens naturally.
Session length: 3-5 minutes. End the session while the dog still has interest -- before they wander off. Leave the board accessible in the room between sessions so the dog can investigate on their own.
What to expect: Most dogs spend day 1 sniffing, circling the board, trying to get at the treats. This is exactly right. You're building familiarity.
Day 2: More Contact, More Reward
Same setup. Same rules. Today, you're looking for slightly more engaged contact -- more pawing at the treat compartment, more sustained investigation.
Reward each paw contact more enthusiastically than sniffing. Use your marker word ("yes" or a click if you use a clicker) the instant the paw touches the board, then deliver the treat.
Keep the treat compartment consistently stocked. The dog should always find a treat when they interact with the board. Running out of treats mid-session breaks the association.
What to expect: Some dogs start scratching on day 2. Many wait until day 3. Both are normal.
Day 3-4: First Scratches
This is usually the breakthrough day. The dog has associated "paw on board" with "treat appears." They start scratching more deliberately, trying to access the treat compartment.
Each scratch = immediate marker + treat. Keep your reward rate high -- every 2-3 scratches at minimum. You want the dog to feel like scratching is working.
Don't worry yet about technique or which paw or how hard they're scratching. Any scratching motion on the sandpaper counts.
What to expect: Visible nail wear. You'll notice the tips of the front nails becoming slightly smoother and shorter after even a few good scratching sessions.
Day 5-7: Building the Habit
By day 5, most dogs are approaching the board without prompting. That's the sign that the behavior has become intrinsically rewarding -- the dog seeks out the board because scratching = treats.
This is the goal. When the dog comes to the board voluntarily, the training is working.
Session structure at this stage: - Let the dog initiate (don't carry the board to them every session -- put it in a consistent spot and let them go to it) - Reward every 3-5 scratches rather than every scratch - Session length can extend to 5-8 minutes if the dog stays engaged
Continue loading the treat compartment, but start to gradually reduce it. The dog shouldn't expect a full meal's worth of treats -- they should expect occasional rewards for sustained scratching.
What to expect: Nails are visibly shorter by day 7. Most owners notice the clicking-on-hardwood-floors sound reducing.
After Day 7: Ongoing Maintenance
3-4 sessions per week keeps nails at healthy length for most dogs. Some high-activity dogs (who run on pavement, dig frequently) may only need 1-2 sessions per week. Monitor the nails -- if you hear clicking on floors, add a session.
Session length: 5 minutes is usually enough. The dog doesn't need to scratch for 20 minutes -- short, consistent sessions are better than infrequent long ones.
Treat the sandpaper pad like any grooming tool: it wears down with use. When the surface starts to feel smooth or the dog's nails stop improving, it's time to replace the pad. Replacement pads keep the board effective and maintain the training association.
What to Do If Your Dog Is Stuck
Won't approach the board at all: Try rubbing the treat compartment with a high-value treat to transfer scent. Let the dog observe you placing treats in the compartment. Leave the board next to their food bowl for a day.

Approaches but won't paw at the board: Reward proximity more aggressively. Then start shaping: reward any movement of the front paw, even if it doesn't touch the board. Gradually raise the bar until paw-on-board is required.
Scratches once, then walks away: Your treat delivery may be too slow. The marker needs to come within 1-2 seconds of the scratch. Or your treats aren't high-value enough -- try something better. Or sessions are too long -- end at 3 minutes instead of 5.
Only uses one paw: Fine. Let it be. Both front paws will engage eventually. Don't physically move the unused paw to the board.
Scared of the board itself: The board is a new object, and some dogs have neophobia (fear of new things). Leave the board in the room without expecting any interaction. Feed meals near the board for 2-3 days before any formal session. Let the dog decide when to approach.
Dewclaws and Rear Paws
The scratch board primarily files the front paws -- specifically the nails that make contact with the sandpaper during scratching. Rear paw nails may also contact the board during vigorous scratching, but this varies by dog.
Dewclaws (the nail on the inside of the leg above the paw) don't contact the board. Check these monthly. If they're getting long, a quick clip or grinder session on just the dewclaw is the right approach -- these nails rarely cause anxiety because the handling is brief and focused.
The Calm Method Difference
The board is the tool. The training method is what makes it work.
The #1 complaint across every scratch board review in the category: "My dog won't use it -- there were no instructions on how to train them." That gap is exactly what the Calm Method was built to close. The training sequence above is what we include with every board.
You can read the full method at thecalmmethod.shop/pages/method. The board is at thecalmmethod.shop/products/the-calm-method.
FAQ
Q: How long before I see real nail shortening? A: Most owners notice visible change by day 5-7 with daily sessions. The rate of filing depends on how often the dog scratches and how much surface contact the nails make. Soft nails file faster than hard nails.
Q: My dog scratches but the nails don't seem to be getting shorter. What's wrong? A: Two possibilities: the sandpaper grit may be worn down (replace the pad) or the dog is scratching on the board edge rather than the sandpaper surface. Observe how the dog scratches and redirect them to the flat surface if needed.
Q: Can I use the board for rear paws? A: Some dogs do contact the board with their rear paws during enthusiastic scratching. For more targeted rear paw filing, you can try propping the board at a slight angle and encouraging the dog to dig at a higher surface -- but most owners rely on the scratch board for front paws and use clippers or a grinder for rear paw maintenance.
Q: How many sessions does it take before the board becomes a habit? A: Most dogs: 7-10 days. Dogs with more caution: 2-3 weeks. Once the dog is approaching the board voluntarily, the habit is set. Maintain it by keeping the board accessible and consistently stocked with treats.
Q: How do I know if the sandpaper pad needs replacing? A: Run your finger across the surface. If it feels smooth rather than slightly rough, it's time to replace. A worn pad won't file nails effectively and also teaches the dog that scratching the board doesn't produce a useful result.
Q: Can multiple dogs in the household share a board? A: Yes. Some multi-dog households find that one dog learning the scratch board speeds up the second dog's learning (observational learning). Use separate treat-loading sessions so there's no resource guarding over the treat compartment.
Related posts: How Long Does It Take to Train a Dog to Use a Scratch Board? | Dog Nail Grinding vs Clipping: Which Is Better?
Learn more about the training method: thecalmmethod.shop/pages/method
The Calm Method board: thecalmmethod.shop/products/the-calm-method